---
title: Interface
description: The Interface handles the visual and communicative aspects of the tour, serving as the most effective means to capture and hold the viewer's attention.
---
[Skip to content](https://info.treedis.com/help.center/interface#main-content)
English
Show submenu for translations
Open main navigation
Close main navigation
- English
Show submenu for translations
- [Go to treedis.com](https://www.treedis.com/)
[Go to treedis.com](https://www.treedis.com/)
This is a search field with an auto-suggest feature attached.
- There are no suggestions because the search field is empty.
1. [Help Center](https://info.treedis.com/help.center)
2. [3D Editor](https://info.treedis.com/help.center/3d-editor)
3. [Interface](https://info.treedis.com/help.center/3d-editor#interface)
# Interface
The **Interface** section controls the visual and communication elements of your virtual tour. It serves as the most effective toolset to capture and hold the viewer's attention.
### **Functionality**
#### **Custom Font Family**
This option allows you to choose the text font used throughout the tour. You can choose any one available in the list: You can select any font family available from the dropdown menu.
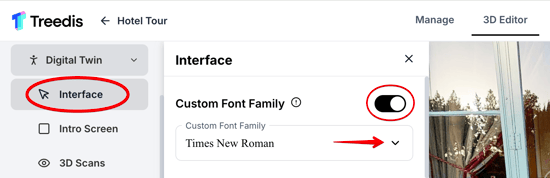
**Note:** Custom Font Family feature is available for ***Business*** and ***Enterprise*** plan users. However, standard text customization is available in the [*Intro Screen*](https://info.treedis.com/help.center/intro-screen) feature, available for all subscription tiers.
#### **Background Color**
Background color allows you to choose any color for the Dollhouse and Floor Plan modes. This replaces the platform's default black background with a hex color of your choice.
 
#### **Logotype**
The **Logotype** option allows you to upload a custom branding logo and define its alignment within the top header of the tour (Left, Center, or Right). The maximum supported logo file size is 5 MB.
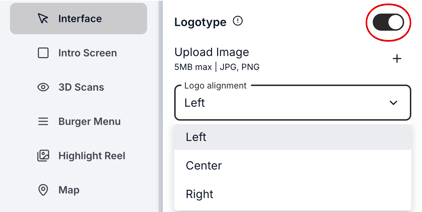
**Note**: If the **Burger Menu** is enabled and your logo is placed on the right side, the logo will be hidden behind the menu.
If the tour is assigned to a Brand Profile who already has an active logo set in their profile settings, the logo uploaded in the Interface **will replace** **the Brand Profile's logo**, regardless of its alignment, **inside the tour** (the Brand Profile logo will still be shown on the Intro Screen, if configured).
#### **VR Features**
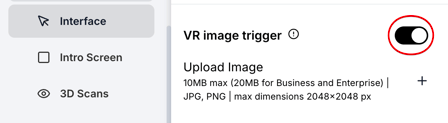
**VR Image Trigger** allows users to trigger an image in VR mode by pressing the joystick button.
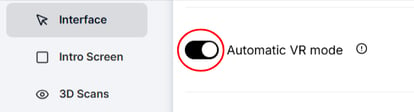
**Automatic VR Mode** starts the tour automatically in VR. The Intro Screen must be enabled for this feature to work.
#### **Interface Video**
This option allows you to embed a video into your tour by adding a link (YouTube or Vimeo URL). You can adjust the video size and enable **Autoplay**if you want a video to appear and start playing automatically upon entering the tour.
**Note:** The video will be located at the bottom left corner of the screen and will play ***muted*** by default when the tour starts.
 
#### **Custom Button**
**Custom Button** (available starting from the Growth plan and above) allows you to redirect the tour viewers to an external webpage.
You can personalize the button by selecting an icon and choosing how the target destination link opens: either as ***iFrame*** (the webpage content opens inside the tour) or as ***New Tab*** (the webpage content opens in a new browser tab).
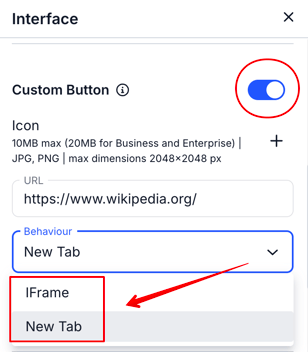
The **Custom Button** appears below the *Burger Menu* icon on the tour or above the *Contact Form* button (if the Burger Menu is disabled on the space).
 
#### **Patch**
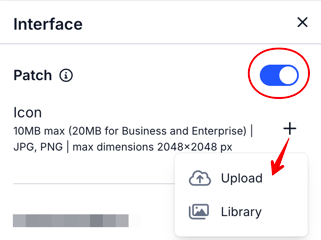
The Patch tool allows you to add a logo (image) to the tripod scan point, the place that you see blurred on the floor. Once your image (JPG, PNG) is uploaded, the scan point with patch will be displayed this way in the tour:
e.g. 
***Note:*** Patch feature is available on the paid subscription tiers.
#### **Communication and Terms**
You can enter your desired information into the *Legal Note* field, which will be displayed at the top center of the tour:


Terms URL, however, will be displayed in an iFrame when the visitors click on the *Terms* button at the right bottom corner:
 
#### **Contact Form**
The Contact Form ('get in touch') allows the visitors to enter their personal details into the contact form in order to request the tour owner get in touch with them.

***Show contact form*** toggle enables the ***Get in touch Tooltip*** shows the envelope icon that opens a contact form: tooltip of the contact form button:
 
***Note:*** If the *Burger Menu* is activated in the tour, the contact form will appear above the location **within the Burger Menu:**
****
**Important:**In order to enable the *Get in Touch* form, you should assign a Client to your tour. Open the tour *Manage section \> Info \> Tours client \>* assign the client and save.
Here is how the contact form appears in the tour.

The message will be sent to the email address specified in the account of the **assigned client**, unless you provide an alternative email in the tour *Manage section \> Contacts \> fill in the box for "Menu Get In Touch Email"*. [Click here for more details on Entry and Contact forms.](https://info.treedis.com/help.center/how-to-collect-leads-from-the-tour)
#### **Timed Lead Form**
The *Timed Lead Form* is designed to pop up at a predetermined time during the tour experience. This form allows the visitors to submit their name, phone number, and email address, if you enable it accordingly. Submitted information will be forwarded to the email address associated with the tour owner.

To configure the *Timed Lead Form:*
- **upload an image** that will be displayed alongside the contact form (mind the file limits);
\- define the **specific time** (min:sec) at which the form will pop up to visitors on the tour;
\- add **URL link** (optional) that will direct visitors to an external website. When visitors click on the image, it will open the specified website URL in a new browser tab;
\- decide on the **boxes to enable**: name, email, phone number.
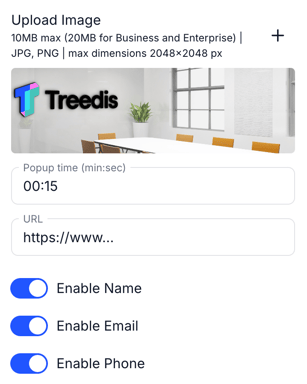
***Legal checkboxes*** are used to display important information or notes to viewers, such as “I agree to the terms & conditions.” Viewers must check these boxes to confirm their agreement in order to send the form.

Here is how the *Timed Lead Form* will appear on the tour:

#### **Restrictions**
You can play around with the toggles listed below to customize the tour up to your needs. Each button has a tooltip and is responsible for viewing/sharing options for the tour visitors, here is a quick recap:
- **Hide 3D Scans -** hide the scan circles on the floor;
- **Enable Screenshots -** show the screenshot button to allow visitors to take and save the screenshots of the tour;
- **Unbranded Tour -** remove all branding from the space (specifically to hide the Client's logo);
- **Hide Cookie Message -** hide the 'cookie' message bar at the bottom of the screen;
- **Make Cookie mandatory -** make the cookies acceptance mandatory;
- **Load tour after cookie is accepted** (if *Make Cookie mandatory* is on) - tour will load only after cookie is accepted (you can also add a custom photo or video for a cookies screen background);
- **Enable avatar mode -** provide the visitors with an option to enter the space with a custom avatar;
- **Enable text chat -** enable [text Chat feature](https://info.treedis.com/help.center/chat) in the tour;
- **Social Sharing Button -** show the social sharing icon to copy the deep link location on the space and enable sharing the tour link in social media;
- **Social Sharing Button (Asset Page)** - show social sharing buttons on *Asset page;*
- **Disable Right Mouse Button -** disable the right-click within the 3D tour.
- **Show VS Button -** enable Hide/Show VS icon in the tour;
- **Notes Enabled** **-** enable [Notes](https://info.treedis.com/help.center/notes-previously-threads) in the tour.
#### **Navigation Units**
The Units settings allow you to choose how measurements are displayed in the Navigation Tool, both in **Web** and **AR** modes. You can toggle between meters and feet, depending on your preference or the measurement system commonly used in your region.

This helps ensure that distances and navigation paths are presented in the format that is most convenient and familiar for the tour visitors.
---
### **Interface: V-Commerce Section**
(works on tours with V-Commerce add-on activated)
These are the basic settings for the [V-Commerce](https://info.treedis.com/help.center/v-commerce) tour:
- The toggle ***Show store*** enables a store icon on a sidebar in the tour:

- ***Hide sidebar config*s** hides the *Settings* option on the sidebar;
- ***Hide sound controls, Hide language select,*** and ***Hide subtitles** **select*** will disable the corresponding controls in the *Settings* option:

- If the phone number is set up for the Client and the icon ***Show sidebar call*** is enabled - the V-commerce sidebar will include a button that gives an option to call the number on click;
- ***Show sidebar address*** will show an icon that opens a location on Google Maps if the tour address is set up:

---
If you have further questions or need assistance with the settings, please contact us at [support@treedis.com](mailto:support@treedis.com)
- [Workspace NEW](https://info.treedis.com/help.center/workspace-new)
- [3D Editor](https://info.treedis.com/help.center/3d-editor#main-content)
- [Interface](https://info.treedis.com/help.center/3d-editor#interface)
- [Intro Screen](https://info.treedis.com/help.center/3d-editor#intro-screen)
- [3D Scans](https://info.treedis.com/help.center/3d-editor#3d-scans)
- [Burger Menu](https://info.treedis.com/help.center/3d-editor#burger-menu)
- [Highlight Reel](https://info.treedis.com/help.center/3d-editor#highlight-reel)
- [Map](https://info.treedis.com/help.center/3d-editor#map)
- [Panorama](https://info.treedis.com/help.center/3d-editor#panorama)
- [Tags](https://info.treedis.com/help.center/3d-editor#tags)
- [Polygons](https://info.treedis.com/help.center/3d-editor#polygons)
- [Measurements Feature](https://info.treedis.com/help.center/3d-editor#measurements-feature)
- [Media / Vimeo / Green Screen](https://info.treedis.com/help.center/3d-editor#media-vimeo-green-screen)
- [Giphy / Sketchfab](https://info.treedis.com/help.center/3d-editor#giphy-sketchfab)
- [Virtual Staging / Avatars](https://info.treedis.com/help.center/3d-editor#virtual-staging-avatars)
- [FAQ](https://info.treedis.com/help.center/faq)
- [Manage](https://info.treedis.com/help.center/manage)
- [IoT Integrations](https://info.treedis.com/help.center/iot-integrations)
- [Analytics](https://info.treedis.com/help.center/analytics)
- [Treedis AI](https://info.treedis.com/help.center/treedis-ai)
- [Work Requests (Notes)](https://info.treedis.com/help.center/work-requests-notes)
- [White Label](https://info.treedis.com/help.center/white-label)
- [Flows](https://info.treedis.com/help.center/flows)
- [Navigation](https://info.treedis.com/help.center/navigation)
- [Experience Creator \*](https://info.treedis.com/help.center/experience-creator)
- [VR (Virtual Reality)](https://info.treedis.com/help.center/vr-virtual-reality)
- [AR (Augmented Reality)](https://info.treedis.com/help.center/ar-augmented-reality)
- [HUB \*](https://info.treedis.com/help.center/hub)
- [Billing & Subscription](https://info.treedis.com/help.center/billing-subscription)
- [V-Commerce](https://info.treedis.com/help.center/v-commerce)
[%20(1).png?width=16&height=24&name=Group%2039638%20(1)%20(1).png "Chill listening crop-3")](https://www.treedis.com)
treedis.com Help Center
Copyright © 2025, treedis.com