Flows is here to revolutionize the way you digitize and manage workflows across your organization. Designed to create immersive, interactive experiences and gamifications, this tool offers Treedis users a streamlined way to enhance virtual tours and boost engagement. In this article we will guide you to understand and build the Flows on the Treedis platform.
Why is Flows a game-changer?
- Build workflows 10X faster and effortlessly manage multiple flows for the same area.
- Visualise your entire workflow from start to finish with a clear, comprehensive overview that keeps your team aligned.
- It's a true no-code tool, empowering your team to create sophisticated workflows without writing a single line of code.
- Use the intuitive condition builder to easily create conditional paths, simplifying complex workflows.
- Enjoy flexible editing, with the ability to revert to previous versions and save drafts as you refine your processes.
Flows add-on is available to users on Business and Enterprise plans.
Watch the Tutorial:
Getting Started
Before you begin creating your gamification experience, it is recommended to prepare a structured scenario outlining your desired flows. Predefined sketches can help you organize the steps effectively and achieve your desired results with ease.
What’s great is that, instead of preparing the scenarios manually, Treedis now simplifies the whole process and allows you to use the TAI Flows (Beta) to generate the Flow structure with the help of AI - Click here to learn more.
To enable the Flows add-on for your tour (available on Business/Enterprise plans), navigate to the left sidebar and unlock the feature. Then, go to the tour workspace and click "Add New."


Here, you can choose to create a New Flow (for manual setup) or use TAI Flows beta to generate the steps structure with the help of AI.
You can also organize your projects using Folders. Each folder can contain multiple flows, allowing you to categorize and manage your projects more efficiently.
Display Bar: Design and Settings
 When creating a new Flow, you’ll be prompted to:
1. Add a flow title – Assign a clear and descriptive name (e.g. Welcome, Onboarding etc.) for easy Flows identification.
2. Select a style for display bar – Choose from predefined dark/light templates or create a custom design, adjusting background, content, and button colors.
3. Previous button – Allows users to return to earlier steps within the Flow.
4. Steps view – Displays the total number of steps in the Flow and indicates the user's current step.
5. Distance from destination – Used as a navigation to show how far the user is from the target location.
6. Exit button – Allows users to exit the Flow at any point during the experience.

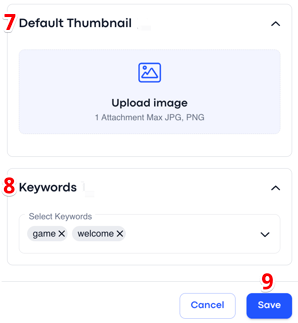
7. You can also upload a Thumbnail Icon to visually represent the Flow in your workspace.
8. Add Keywords (optional) to help you quickly find your Flow in the list. For example, if you add keywords like game or welcome, you can simply type the keyword into the search bar, and the corresponding Flow will appear.
9. Once you click Save, your Flow project will be saved as a draft. Here, you can begin creating the Flows steps and later publish it to make it visible in your public tour.

Building the Flows
The Flow consists of steps that guide users through a series of interactive actions. Once you open your Flow draft, you will see a layout with a default starting point and finishing point.

1. Starting Point
Click on STARTING POINT to initialize the Flow and create the first condition. 

For the starting point you can choose from 3 options to:
- Hide asset (1) such as tags, polygons, media and 3d objects.
- Hide sweep (2) which let you hide scan points to restrict access to specific area(s) within the space.
- Position user (3) at a specific location in the tour when the Flow begins.
For example: If we choose to hide assets to create a clean slate for the experience: WHEN the flow starts → THEN hide assets (and select the specific items such as tags, polygons, media, or 3d objects we want to hide upon starting the experience). The Starting Point will look as follows:

You can click the "+" icon to create additional settings for the starting point, if needed. For example, you can position the user at a specific location using a deeplink or connect a position to some asset (tag, polygon, media or 3D object).
2. Creating New Step
When the starting point is ready, click the "+" icon to create a NEW STEP of your Flow.

- Add title and description (optional) for the new step - this will appear on the display bar to guide users and help them navigate through the experience.
- Add image icon (optional) - to make the display bar more visually appealing and interactive.


3. Step Position
Next, set the step POSITION – this defines the location where your first step in the Flow will begin. You can choose from 2 options to define the step position: connect the step to (1) some asset (such as a tag, polygon, media, or 3d object) or (2) deeplink for a precise location.


- For both options (asset and deeplink), you can enable the Position Button by clicking the settings icon. This feature works only in web mode and allows users to teleport to the specified location either with specific effect or using virtual bubbles.
- Choose a movement type from the 4 available options: navigation path, flyover, fadeout, or instant transition effect.


4. Step Conditions
Set up the step CONDITION – this determines what should happen in the tour when the step starts. You have two options to initialize the step:
- Either make it when step starts (1)
- Or when some asset is clicked (2) such as a tag, polygon, media, or 3d object.


Below, you can see the available options to choose from:
 OR
OR 
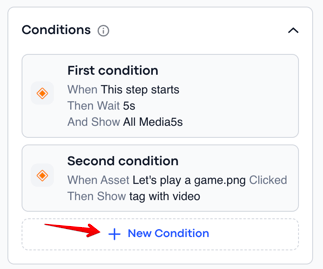
Example for #1: If we choose the condition WHEN step starts → THEN we want it to wait for 5 seconds and show the Media image in the tour. The condition will be as follows:

Note: All assets (such as tags, polygons, media, and 3D objects) should be uploaded or created in the workspace and positioned on your space before you start building the Flow. However, you can always return to the workspace to adjust item locations as needed for your experience.
Example for #2: If we choose the condition WHEN asset (image) is clicked and after music starts → THEN show asset (video tag). The condition will be as follows:

You can create additional settings within same condition by clicking the "+" icon, which will provide you with options to proceed. Select actions based on the needs of your Flows project. Once everything is configured, click Save.


Note: It is recommended not to exceed 20 conditions - both for the settings within a single condition and as the total amount of conditions for one step, for optimal organization and smooth system performance.
It is also important to understand the difference between:
-
Multiple settings within a single condition (case #1)
-
Multiple conditions within a single step (case #2)
The point is that same condition can't be assigned to multiple assets. You can do it only if you create multiple conditions (as in case #2). For example, if clicking on an image triggers a tag to appear, then a separate condition is needed for clicking the tag to make a polygon appear, and so on.


5. Next Step Trigger
When the conditions for the first step are created, you need to decide on the Next Step trigger to transition between steps. You can choose from two options:
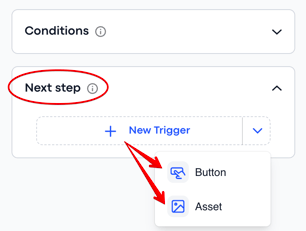
- Button – You can name the button as needed, such as "Next" or any other title. You can create numerous buttons within one step. Buttons can also serve as triggers to start different flows.
- Asset – This includes tags, polygons, media, or 3D objects. The settings for the Asset trigger are the same as for the Button, except you select a specific item to be a trigger for the next step.
For example: If the Next button is selected to trigger the next step → Then in the next (second) step you will determine what should happen in the tour.

To create the new (second) step for your Flow, click the + icon:

You can also duplicate an existing step by hovering over it and selecting the duplicate option. After creating a duplicate, you can adjust or completely change the settings as needed for the next step.

Create as many steps as necessary for your Flow experience. Once all steps are ready, just drag and connect the steps with arrows to establish a logical sequence.

6. Define a Finish Point
Choose an action upon Flow completion:
-
Return to Tour – Redirects users back to the tour after completing the Flow.
-
Start Another Flow – Transitions users into another Flow, creating a continuous interactive experience.
-
Finish Screen – Displays a pop-up at the end of the Flow, featuring a custom message (e.g."Congratulations, you won!") and an image.

The video guide on how to create multiple finish points:
7. Editing and Publishing
Once everything is finalized, connect the starting point, steps, and finish point. The Flow will become active on your tour's public link only after you click Publish. Published Flows are live and ready for users to engage with in your tour.

Users can start the Flow by clicking on the relevant icon in the tour. You can have a single Flow project or multiple Flows for users to choose from.

If you want the tour to begin with a specific Flow as the default starting point, then enable Run on Launch.

You can also:
- Move Flows to a folder.
- Export Flow settings (*currently under development).
- Delete the Flows project.
You can edit Flows at any time, even after publishing. To make changes, simply access the Flow settings to update step details, conditions, or overall configurations. After each modification, click Update to apply the changes.

If you make significant changes to a Flow and don’t want users to see the updates immediately, you can revert a published Flow to draft mode.

For better navigation and workflow use the zoom in/out icons on the panel for convenience. The position me icon shows your current location within the Flow settings.

The graphic layout view in the bottom right corner helps visualize step placement and the overall structure of your Flow project.

Explore this sample tour with Flow steps to grasp its idea and have a clearer understanding. Enjoy creating your new, great experiences!
If you have further questions or need assistance with the settings, please contact us at support@treedis.com