Welcome to TAI (Treedis AI) Design, our new AI-powered image editing suite that allows you to virtually stage and modify spaces directly from your digital twin. Using simple conversational language and intuitive tools, you can transform any view into a stunning concept.
TAI Design is currently in beta, and available for Business and Enterprise users to test for free for 1 month. Your feedback is invaluable as we continue to refine its capabilities.
How to Activate TAI Design
Before you can use the editor, you must first activate it in your workspace settings.
- Navigate to your Workspace and open the Interface feature.
- Locate the toggle TAI Design to turn the feature on, click save. The TAI editing button will now be available in your tour.

Launching the TAI Image Editor
Once activated, you can start an editing session from any point within your tour.
- Open your space in the public link and navigate to the view you wish to edit.
- Click the TAI Image Editing button located in the bottom-left corner of your screen.

- This action will automatically capture a high-resolution screenshot of your current view (without any interface elements) and open it in the TAI Design editing overlay.

Using the Editing Tools
The TAI Design editor provides a powerful set of tools to bring your vision to life.
AI Editing with Text Prompts
The core of TAI Design is its conversational editing capability. Simply tell the AI what you want to change. At the bottom of the screen, you'll find a text input field.
- Type your command, such as "Change the floor to dark parquet," "Add a large, modern art painting on the back wall," or "Make the room feel more spacious and bright."
- Click the Send button.

3. A loading animation will appear over the image while the AI processes your request. The image will then update with the generated changes.
The Overlay Toolbar
For more precise control, use the toolbar located below the text input field - a wide shot of the main toolbar, showing all the primary icons: Place Object, Draw Area, Undo, Redo, Compare, and Download.
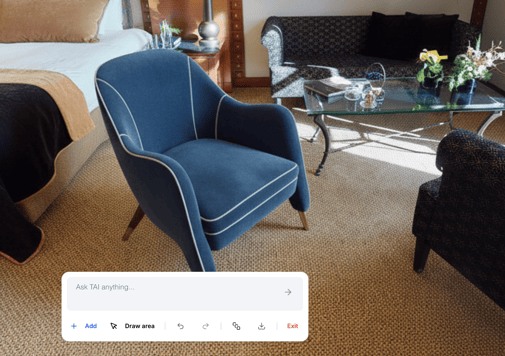
Placing Object:
- Click this icon to open your computer's local file browser.
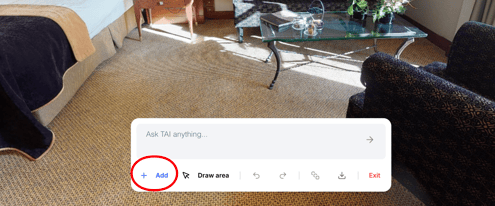
- Select an image file (e.g., a png of a sofa or a lamp).
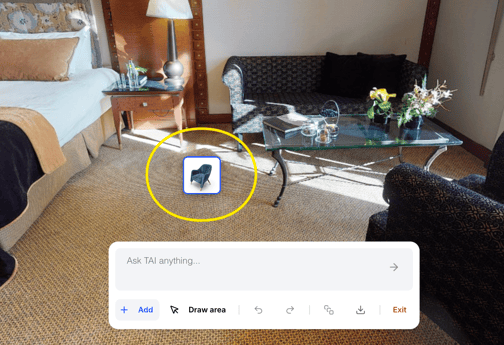
- Click anywhere on your main image to place the selected object.
Draw Mode:

Tool (1-2): Switch between the Brush and the Eraser.
Brush Size (3): Choose from Small, Medium, or Large
Reset (4): This will clear all drawings you have made on the canvas without affecting other edits like AI changes or placed objects.

-
Toggling the Brush button activates a secondary toolbar for free-hand drawing and masking. This allows you to select the specific area you want to change without affecting the entire space.
-
Once the area is highlighted using the Brush, type your command into the text input field and specify the desired action, for example, “Paint the wall pink.”

- It will edit only the defined area that you have drawn.

Undo / Redo:
Use the arrow icons to step backward (Undo) or forward (Redo) through your entire history of edits. This includes AI-generated changes, object placements, and drawings.


Compare Mode:
Click this icon to see a side-by-side comparison of your work.

A draggable slider will appear, allowing you to swipe between the original screenshot ("Before") and your currently edited version ("After"). This is perfect for visualizing the impact of your changes.

Download:
When you are satisfied with your edits, click the Download button to save the current image as a high-quality file to your computer.


Exiting the Editor
To close the TAI Design editor and return to your tour, click the Exit (X) button in the top-right corner of the screen.

Important: The TAI Design editor is a session-based tool. All edits are discarded when you exit the editor. The feature does not save your work between sessions. Always remember to download your final image before closing the overlay.
If you have further questions or need assistance with the settings, please contact us at support@treedis.com