The Polygons feature allows you to make any object or area in your tour clickable and interactive. By creating a frame around specific elements, you can attach actions or content to them, enhancing the experience for your visitors. With Polygons, you can highlight and make areas such as walls, windows, doors, furniture, or any spot within your space clickable, bringing your tour to life with engaging, interactive elements.
Functionality
Adding a Polygon
Start using the polygons by clicking + Add and decide where to place it on the tour. When you place it, you will see a transparent cube, which can be applied to any object or location. From now on, this place on the tour will be clickable and interactive, depending on the action assigned to this polygon.


Polygon Settings
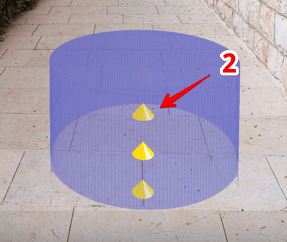
At first, insert a polygon label (1). In the Mode panel (2), you can adjust the polygon's location, shape, and size by manipulating the vectors:


The toggle Active makes the polygon visible in the tour. Disable this toggle to hide a polygon on the space without deleting it.
In the following section, you can edit the polygon location, shape, and size using X - Y - Z dimensions:

Enable the Lock Scale toggle to ensure that the polygon's X and Y parameters remain proportional, maintaining its size and shape consistency.
Action Types
Action type is a specific action that can be assigned to the Polygon:
 Matterport (Fly-Over) – redirects visitors to a Matterport tour with a fly-over transition effect. The deep link for location can be retrieved by pressing U inside the Matterport tour.
- Matterport (Instant) – redirects visitors to a Matterport tour with a direct-entry effect. The deep link for location can be retrieved by pressing U inside the Matterport tour.
- Tour Link – redirects visitors to a Treedis tour. The deep link for the location can be retrieved by pressing CTRL+Y inside the Treedis tour.
- New Tab – opens a URL or webpage in a new browser tab.
- Panorama – opens a panorama view (ensure the panorama is added and enabled for the tour beforehand).
- I-Frame – embeds and displays external website content directly within the tour. Use an iFrame tester to verify if the link is compatible.
- Music - plays music when the polygon is clicked.
- Text - displays text upon clicking the polygon.
- Image - opens an image.
- Video - starts a video (supports YouTube/Vimeo URL).
- Menu - allows to highlight an item in the Burger Menu after clicking on the polygon. You will need to select which Burger Menu item to assign to it.
- Experience Pop-Up – combines video+text or image+text in a single pop-up window, with options for vertical or horizontal layout.
- Flow – used for setting conditions within the Flows feature.
 After selecting the action type, choose how you would like the polygon to be activated: either by clicking on it (On Click) or by hovering over it (On Hover).
Based on the selected action type (i-Frame,Text, Image, Video) you may need to configure its settings separately for both Desktop and Mobile views. This includes entering text or a URL twice, adjusting the size in either percentage or pixels, uploading a specific file for the polygon, etc.


Colors and Customization
Here, you can select and customize the colors for the polygon itself and for interaction modes, such as clicking or hovering.

You can also adjust the polygon opacity - making it more or less transparent, when hovering over or clicking on it.
The same applies to the edges opacity - you can define how visible the edges should appear by default, and while hovering over or clicking on it.


To make the polygon completely invisible, set all related opacity values to 0 by moving the sliders fully to the left. When the polygon is invisible, visitors will be able to interact with the object in the tour without seeing the polygon itself, while the assigned action will still remain active.
 Move the Corner Radius slider to the desired percentage (%) to transform the default polygon cube shape into a more rounded, pipe-like appearance.
Enable the Pipe Arrows toggle if you want animated moving arrows to appear on the polygon.

If you have further questions or need assistance with the settings, please contact us at support@treedis.com