Media is a powerful feature that enables you to incorporate images and videos directly into your 3D tour. Whether you want to cover an empty wall, replace a black TV screen, or add branding elements, this tool allows you to create a more engaging and visually dynamic experience. Additionally, you can use Media to add HTML links and discover Giphy integration, which provides an access to a vast collection of GIFs, stickers, and exclusive content to further enhance your virtual space.
Functionality
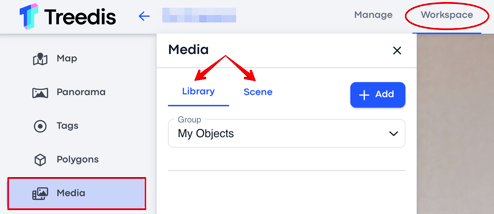
Library & Scene
Before using the Media feature, it's important to note that all media objects are categorized into two sections:
- Library – a tour library where you can upload and store your own files before adding them to the tour.
- Scene – a section that allows you to navigate and manage media objects that have already been added to the tour.
My Objects and Giphy Integration
Before adding a media object to your tour, you need to choose its Group type:
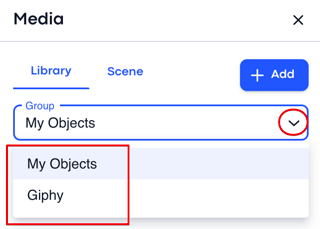
- My Objects – own items that you upload to the tour (jpg, png, mp4, Vimeo video, HTML links).
- Giphy – integration that provides access to engaging content such as GIFs, stickers, emojis.
Note: Giphy and animated stickers are available for Business and Enterprise plan users.
To add a Giphy item, you will need to sync your Giphy account with the Treedis platform (see a video guide). When account is synchronized, just type in the needed object into the search bar to find the desired Giphy item:

To add your own Media object, click + Add where you will be offered to add the Image, Video, or HTML.


1. Image
To add an image to the tour, click + Add and select Image type. You can add an image using one of the following methods:
1. URL link – insert an image using a direct link from a file-sharing platform.
2. Upload from device – upload an image directly from your device in JPG or PNG format up to 10 MB (or 20 MB for Business/Enterprise plan users). The maximum image resolution is 2048 pixels for width and height.
3. Tour library – select an image from your tour library, if the image has been uploaded there in advance.


Once an image is uploaded, place it within the tour and adjust its parameters as needed. You can modify the image size and position using the following methods:
1. Move, Rotate, and Scale mode.
2. X-Y-Z dimensions.
3. Lock Scale - enable this toggle to maintain equivalent scaling on the X and Y axes, ensuring the object remains proportionate within the tour. Disable it if you prefer to manually adjust the X and Y dimensions.


Let’s explore the key parameters related to image settings:
- Asset name - to label the media object (image) in the tour library.
- Active - makes the media object visible in the tour. Disable this toggle to hide an object on the space without deleting it.
- Auto rotate - automatically rotates the media object toward user's position on the sweep.
- Enable hover animation - activates the object's animation only while hovering over it.
TIP: The Asset Name helps differentiate multiple images with identical titles. If you add two images to your tour both titled “Art.png” and place them in the space, the system may encounter a conflict during image editing, as it cannot determine which image should be modified. To avoid this behavior, assign a unique Asset Name to each image, which ensures proper differentiation within the tour workspace and allows each image to be edited correctly.
Animation and Render Range
To make your media object more interactive and improve its loading time within the tour, you can also configure the After Click Effect, Animation settings and Render Range.


|
After Click Effect and Animation |
Render Range and Distance |
|
After Click Effect:
|
Render Range – defines the distance in meters at which the media object becomes visible within the tour. Start Animation Distance – specifies the distance at which visitors will see the animation assigned to the media object. Usually, this distance matches the render range. |
Important: If no render range is set for Media / Virtual Staging items, then all objects will load simultaneously when the tour launches. This may cause object freezing, tour performance slowdowns, or crashing issues on mobile devices.

- Trigger VS Animation – if a Virtual Staging 3D object is added to the tour and selected as the trigger, clicking on the image in the tour will activate the designated 3D object.
- Trigger VS Video – similarly, if a Virtual Staging video is added to the space and selected as the trigger, clicking on the image in the tour will play the linked VS video.
- Trigger Appearance After Animation – it keeps the media image hidden in the tour until the selected animation (VS video or VS object) has fully played.
Image Action Types
The media image can be assigned a specific action type to enhance interactivity and guide visitors within the space:

- Matterport (Fly-Over) – redirects visitors to a Matterport tour with a fly-over transition effect. The deep link for location can be retrieved by pressing U inside the Matterport tour.
- Matterport (Instant) – redirects visitors to a Matterport tour with a direct-entry effect. The deep link for location can be retrieved by pressing U inside the Matterport tour.
- Tour Link – redirects visitors to a Treedis tour. The deep link for the location can be retrieved by pressing CTRL+Y inside the Treedis tour.
- Navigation Path – creates a navigation path by displaying virtual bubbles between the media image and a deep link location within the same tour.
- New Tab – opens a URL or webpage in a new browser tab.
- Panorama – opens a panorama view (ensure the panorama is added and enabled for the tour beforehand).
- I-Frame – embeds and displays external website content directly within the tour. Use an iFrame tester to verify if the link is compatible.
- Music – plays music when the image is clicked.
- Image – enlarges the media image when clicked if no other image is uploaded as the action type.
- Experience Pop-Up – combines video+text or image+text in a single pop-up window, with options for vertical or horizontal layout.
- Flow – used for setting conditions within the Flows feature.
2. Video
MP4 and Vimeo
To add a video to the tour, click + Add and select the Video type. There are two methods to add a video:
- Upload File – upload an MP4 file from your device or the tour library (if the video has been uploaded there in advance). The file size limit is 10 MB (or 20 MB for Business/Enterprise plan users).
- Vimeo Link – insert a video using a Vimeo URL (no size limitations), available exclusively on the Business/Enterprise plans.
Note: To use Vimeo links, you must first assign a client to your tour and generate a Vimeo API Token for that client. Click here for more details on how to use Vimeo links.


When adding a video to the tour, you can position it using the Move, Rotate, and Scale buttons or by adjusting the X-Y-Z dimensions, similar to image placement - click here to review.
Below are the available video settings:
- Asset Name – to label the media object (video) in the tour library.
- Active – the video will appear in the tour with "Play" and "Mute" buttons. Disable it if you want to hide the video on the space without deleting it.
- Autoplay – the video will start playing automatically muted, with a "mute" button visible to turn the sound on.
- Hide Mute Button – the video will start playing automatically with sound ON, without option to turn the sound off.
- Mute Sound – plays the video muted without an option to turn the sound on (applies only to videos with active toggle "hide mute button").
- Hide When Animation is Complete – if an animation is applied, the video will disappear once the animation ends.
- Loop – the video will continuously repeat.
- Show Pre-Loader Animation – displays a loader animation in place of the video while it loads.
- Auto Rotate – the video will automatically rotate towards the user's position on the sweep.
Click here for more details on the video After Click Effect, Animation settings and Render Range.
Green Screen Video

Green screen videos allow you to place a filmed object or speaker into a 3D space, removing any background for a immersive effect.
To add a video to the tour, click + Add and select the Video type.
Simply upload the MP4 file with a green background, enable the Use Green Screen toggle, and our system will handle the rest.
Click here to find a guide on how to add a Green screen video.
3. HTML
HTML links are interactive hyperlinks that let users view and engage with website content directly within a tour. To use HTML feature, simply insert the desired URL and position it in your tour:


Take into consideration that not all websites allow their links to be embedded. Use the iFrame tester https://iframetester.com to check whether your website link can be displayed in the tour.
Note: HTML feature is available on the Business and Enterprise plans.
If you have further questions or need assistance with the settings, please contact us at support@treedis.com