Welcome to TAI Design, Treedis’ new AI-powered image editing suite that allows you to virtually stage and modify spaces directly inside your digital twin. Using simple conversational commands and intuitive tools, you can transform any view into a stunning concept.
Click here to learn more about how the TAI Credits system works.
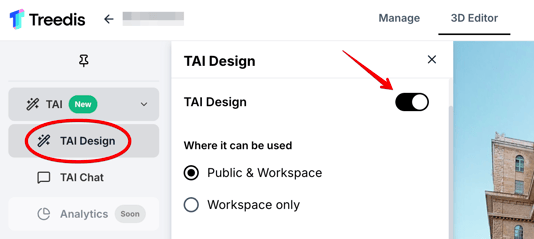
How to Activate TAI Design
Open the tour 3D Editor > select TAI Design from the left sidebar > switch the TAI Design toggle on to enable this feature in the tour.
Opening the TAI Design Editor
You can choose where the feature should be active: 1) Public and Workspace mode, 2) or Workspace only. Both modes consume TAI credits in the same way.

Once TAI Design is activated, you can start an editing session from any point within your tour:
- Open your space via the public link and navigate to the view you want to edit.
- Click the TAI Design icon located in the bottom-left corner of your screen.

- This action will automatically capture a screenshot of your current view (without any interface elements) and open it in the TAI Design editing overlay.

Editing with Text Prompts
The TAI Design editor provides a powerful set of tools to bring your vision to life. The core of TAI Design is conversational editing. At the bottom of the editor, you will find a text input field where you can describe the modification you need.
- Type your command, such as "Change the floor to dark parquet," "Add a large modern art painting on the back wall," or "Make the room feel brighter and more spacious."
- Click the Send button.

- A loading animation will appear over the image while the AI processes your request. The image will then update with the generated changes.

TAI Toolbar
Below the text input field, you will find the main toolbar, which includes all the primary icons:

1. Upload object icon
2. 2D / 360° mode switcher
3. Undo / Redo buttons
4. Segmentation button
5. Compare button
6. Download button
7. Tour credits balance
Uploading Your Own Objects
Click the Upload icon to browse files from your device.

Select an image (example, a PNG image of a plant) and describe where and how it should appear (e.g., size, position). TAI Design will then place and blend the object into your scene. You can further refine placement using additional text commands.


Edit Modes: 2D & 360° Image Generation
You can now apply TAI edits not only using a screen capture in 2D mode, but also by working in full 360° (panorama) mode for more immersive and comprehensive redesigns.
Simply type your command into the text input field, then select the desired mode and quality from the toolbar. The available options include:
- 2K 2D image generation (40 credits per prompt)
- 4K 360° image generation (60 credits per prompt)

You can also decide whether both modes (2D and 360°) or only one of them will be available for editing on your public tour, and select which mode should be opened by default.

Each time you create a new design or edit a space using the TAI tool, a certain number of credits is consumed. The cost depends on the complexity and resolution of the generated output - whether it is 2D or 360° (Panorama).
Although your account maintains a total pool of TAI Credits, you have full control to allocate a specific number of credits to each individual tour. The remaining credit balance for a tour is displayed in the bottom-right corner of the TAI toolbar.

Click here to view detailed information about TAI Credits usage and how to set up credit limits for individual tours.
Undo / Redo Buttons
Use the arrow icons to step backward (Undo) or forward (Redo) through your entire history of edits. This includes AI-generated changes, object placements, and drawings.

Segmentation Button
The Segmentation option is designed for surfaces such as flooring, walls, large furniture items etc. It allows the AI to treat the selected object as a complete surface and apply edits using segmentation, rather than modifying individual parts separately.
This allows you to select the specific area you want to change without affecting the entire space.

After clicking the Segmentation button, the system will begin processing the segments. Please allow approximately 15 seconds for the analysis to complete.

Once the processing is finished, you will be asked to tap or click on the area you would like to select and edit. For example, the two walls on the sides.

The following options are available within the Segmentation panel:
1. Apply - Once the desired elements are selected, click the Apply button to proceed with editing the selected areas.
2. Fix Selection - Allows you to add or remove areas from the current selection.
3. Undo - Reverts the last action/step.
4. Reset - Clears the selected elements all at once and restarts the segmentation analysis for the space.
5. Cancel - Exits the segmentation mode.
Once the green Apply (1) button is clicked, the system will return to the TAI panel, where you can enter a text prompt describing how you would like the selected areas to be modified by the AI. Then click 'Send' button to apply a prompt to your space.

Compare Mode
Click the Compare icon to see a side-by-side comparison of your work using a slider.

You can drag the slider to compare the original scene ("Before") with the edited version ("After"). This is perfect for visualizing the impact of your changes.

Additionally, a minimization button allows you to view your results in full-screen mode without interfering with the toolbar.

Download Button
When you are satisfied with your edits, click the Download button to save the current image to your computer. The image will be saved in the same mode (2D or 360°) that was originally selected for the edits.

Project Saving
When you are satisfied with the final overlay, you can save the project to revisit and review it later within the tour. Saved designs will be stored in your project history and can be accessed at any time directly from the tour.
To save your AI edits, click the + button and select Save & New.

Once saved, your project will appear in the circular icons that represent your project history. By selecting one of these circular icons, you can view projects that were previously created and saved for this space.

A maximum of 5 projects can be saved per space. When this limit is reached, new projects will not be saved unless an existing project is deleted.

If you want your edits to have a specific title, click the three dots to rename the project before saving.

Project Sharing
In addition to saving your design sessions, the TAI feature also allows you to share them with others. To enable sharing, simply turn on the Sharing toggle within the TAI Admin panel - no additional configuration is required.

Once activated, a Save & Share option will appear within the TAI interface. By clicking the Save & Share button, you can generate a shareable link to your saved design, which can be distributed to partners and clients for review.

Additionally, you can enable the "Request Email Verification" option, which will require a one-time email verification during the saving process. This verification allows the system to associate a unique code with the saved projects.

After clicking Save & Share, you will be prompted to enter your email address so the system can send you the tour link with the ready overlay.

Verify your email address by entering the code. Once confirmed, the system will generate the tour link containing your finalized design edits, which you can further share with collaborators or team members.


Exiting the Editor
To close the TAI Design editor and return to your tour, click the Exit (X) button in the top-right corner of the TAI toolbar.

Important: The TAI Design editor is a session-based tool. All edits are discarded when you exit the editor, as the feature does not automatically save your work between sessions. Always download or save your project before closing the editor to avoid losing your changes.
If you have further questions or need assistance with the settings, please contact us at support@treedis.com